Upload a student list (for advanced users)
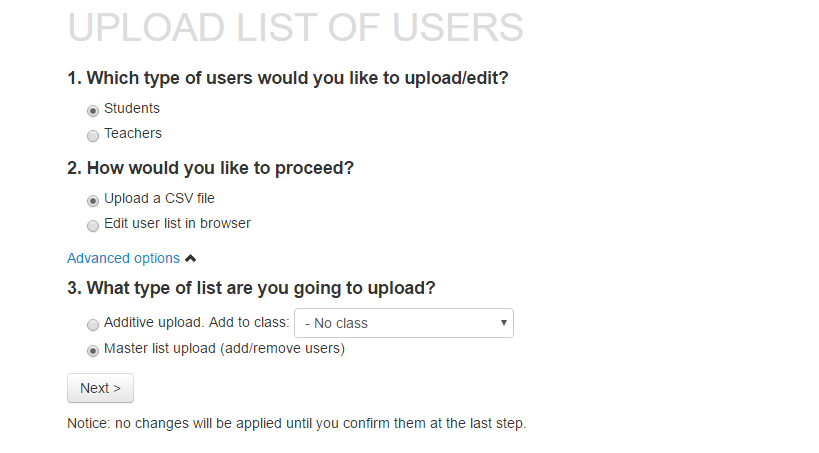
EarMaster Cloud user list uploads can contain either students or teachers, can be uploaded as .csv files or directly from a browser, and can work as reusable master lists or single-use additive lists.
You can combine the options available according to the list you are uploading
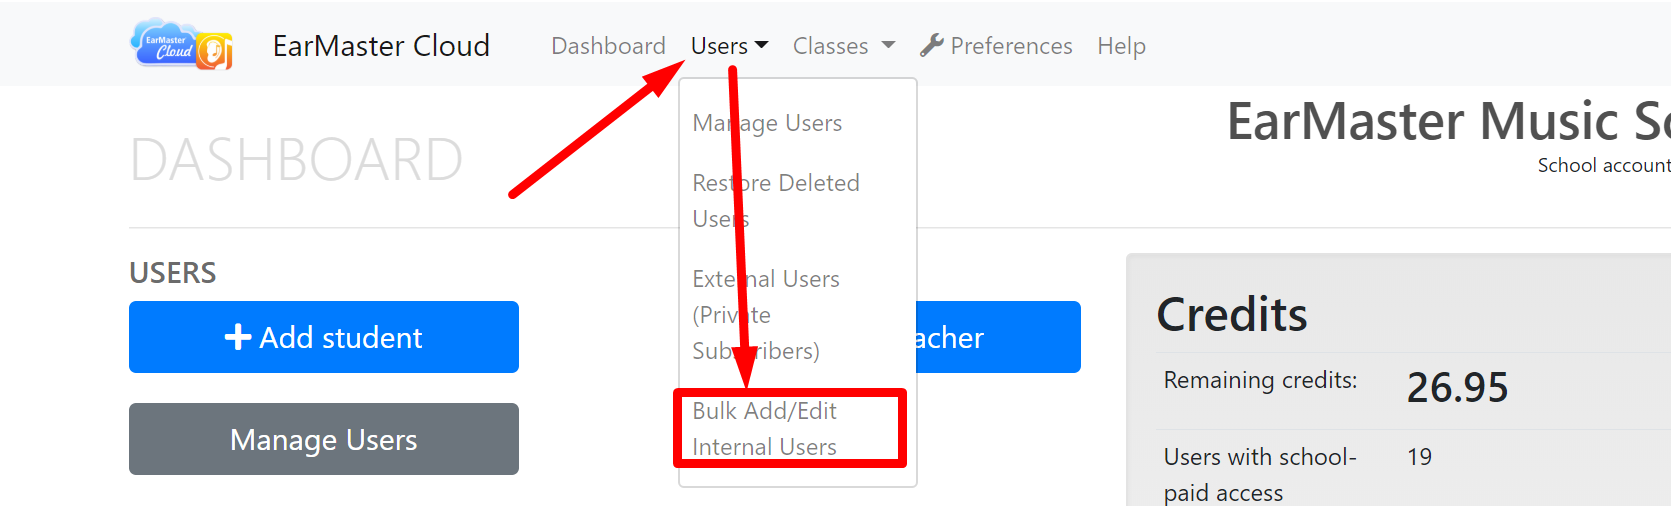
To upload a user list, go to https://cloud.earmaster.com and click on Users-->Bulk Add/Edit Internal Users
Master list upload
You can add, edit, and remove EarMaster Cloud users in bulk with a Master list. This means that you will be updating and uploading the same file each time you need to add or remove students to or from your account.
After each upload, EarMaster Cloud will compare the new list with the users already in your account, and will operate the detected changes:
- new users will be added
- users that are currently in your account but who have been removed from the uploaded list will be deleted
- users already in your account will not be modified (unless their details have been updated in the file, in which case the modified fields will be updated)
You can edit your master list and re-upload it when new students are added or when former students are removed. The updated file that is uploaded should include both current users and new users. Students that are not listed in the file will be removed from your EarMaster Cloud account.
Additive list upload
Instead of maintaining a master list for your school, you can choose to upload lists that only add users: Additive lists. You can choose to upload either a list of students or a list of teachers.
These users can be added to the root of the account, or to specific classes. To upload users to a specific class, choose a target class in the drop-down menu "Add to class".
How to create, edit and save a user list
1) Create and edit your lists with Excel, Notepad (Windows), Numbers (Mac), TextEdit (Mac), Google Sheet or other editors that can export CSV files in UTF-8 format.
2) Add one student per line using this format:
<first name>,<last name>,<email>
You can use a header in your file, and fields can be separated by either a column ( , ), a semi-column ( ; ) or a TAB.
Example:
Jorge,Lopez,jlopez@email.ear
Ella,Jensen,ejensen@email.ear
Kim,Lua,klua@email.ear
* you can optionally add a <username> and <password> for each user: <first name>,<last name>,<email>,<username>,<password>. If they are not specified, they will be created automatically by EarMaster Cloud for each student. You can also specify just the <username> and let the password be generated.
* Users are identified by their email. It is therefore very important that each user has his own email. 2 users with the same email will be handled as duplicates by EarMaster Cloud. You can however "trick" the software into treating identical emails as unique ones. To do that, add ?[some text] after the alias. For example if a family uses the email family@email.ear and the kids' names are Elizabeth, Peter and Ophelia, you can construct the addresses family?liz@email.ear, family?pete@email.ear and family?ophie@email.ear and all emails sent to those constructs will end in the inbox of family@email.ear.
3) Save or export the file as .csv in UTF-8 format.
Uploading the list
When you upload a user list, EarMaster Cloud pre-processes it first and then shows you a detailed summary of the changes that are about to occur in your account. Look closely at this summary and make sure that your file was interpreted correctly by EarMaster Cloud before applying any changes to your account.
If everything looks as it should, click PROCESS to apply the changes.
New users will instantly receive their user credentials by email, updated users a notice about their account being updated, and removed users a notivation that their access tot he software has been revoked.
If you find problems in the pre-processed results, then click on the BACK button and fix your file or contact our support team.